blog2

EHH week 36: heating system

With a superinsulated enclosure and triple glazed windows, the heating system does not need to be big.  We considered and rejected both ground coupled heat (often called “geothermal”) and radiant floor heat because both would be overkill for the minimal needs of this house.


Ecotope, the mechanical engineer, recommended an inverter driven split system heat pump, made by Mitsubishi.  For each kilowatt of electricity input to a heat pump, it will provide about 2.5 kilowatts of heat, because a heat pump moves heat instead of generates heat.


A heat pump operates on the refrigeration cycle, but instead of cooling the inside of a refrigerator, it heats the inside of a room.  Heat pumps can provide air conditioning too, in which case they act just like a refrigerator. 


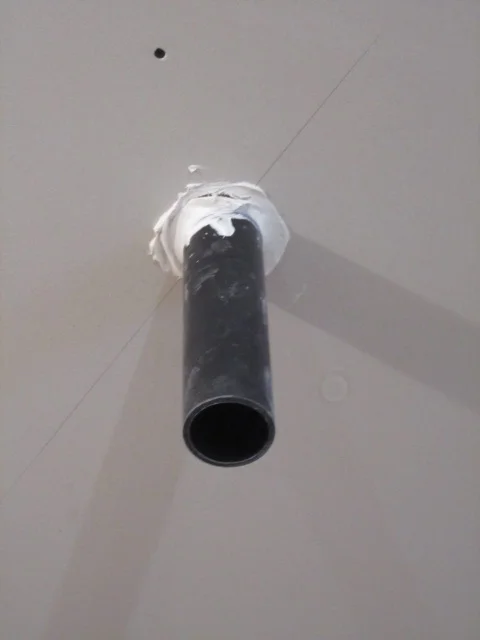
There is one outdoor unit, which is the compressor, attached to the garage.  Inside we have six zones, each with its own programmable thermostat.  Three of the zones have condenser units in utility rooms and their heat is distributed by ducts.  The ducts are air sealed at every joint with a gray mastic to eliminate leaks.  Aluminum diffusers at the end of the ducts are either set flush in the wood floors or on top of the concrete floors, so they look great and familiar.


The other three zones are heated by wall mounted condensers that emit low velocity heated air.  These white units, called “cassettes,” must sit high on a wall, usually over a door.  They are not as elegant as floor diffusers, so we used them in less important rooms. 

EHH week 35: painting

As the project nears the end, the walls and ceilings get painted.  To assure optimal indoor air quality, Model Remodel used a zero VOC (volatile organic compound) paint manufactured in nearby Portland, Oregon.  The painter had never used Yolo Colorhouse paint before, but was pleased that it went on smooth and leveled well.


The homeowners’ preference was for a simple color palette, so most of the paint is a creamy white.  A few rooms received accent colors, such as green in the master bedroom.  As is customary, each color choice was painted on a piece of wall before making the final selection.


Besides low VOC paint, all of the other finishes, sealers, caulks, and adhesives used in the interior of the house were specified to be low VOC.  This meant that there was no unpleasant chemical smell inside during the finishing phase of the project.


The house really looks sharp with the paint in place.  The white acts as a muted backdrop for the warmth of the wood floors or the cool grey of the concrete floors.  The dark window frames provide a bold accent, as does the powdercoated steel at beams and railings.  The absence of wood trim at windows, doors, and wall base is most noticeable now, and the spare detailing really makes for serene rooms.


EHH week 34: shower enclosure

For this house, we architects were asked for minimal maintenance finishes and in particular no tile grout joints.  This reasonable request posed a difficulty at the three showers, where tile is the material of choice.


To finish the shower enclosures, we selected a cement plaster called Milestone.  Since it is troweled in place it has no joints, just smooth surfaces.  The color is integral, consisting of mineral pigments just like colored concrete.  And it goes on walls and floors so we could use the same mix and color for all surfaces.


To form the shower pans, we recessed the floor structure a couple inches.  This recess was waterproofed with Red Guard, the same liquid applied membrane we used under the concrete floor topping.  Before proceeding, the membrane is flooded and allowed to stand for 24 hours to assure there are no leaks.  The recess was reinforced with metal lath and then filled with a mortar bed mix that is fairly dry.  The mortar bed is formed to slope towards a central drain.  After it cures, the cement plaster is troweled over it.


As an aging-in-place feature, we designed the shower stalls with a flush threshold instead of a raised curb.  At one shower that will be used now by 80-year olds we installed grab bars.  In the other that will be used by 50-year olds we omitted the grab bars for the moment, but installed wood blocking inside the walls ready for grab bar screws in the future.

EHH week 33: energy monitor

This house is aiming to be a net zero energy dwelling.  In order to reach that ambitious goal, the homeowners will need to carefully manage their energy usage throughout the course of the year.


Reading the main utility meter only tells the total electricity consumed.  But if it is running high, they need to know where exactly the power is going.  Is it the hair dryer?  Are the garage door openers on standby?


There are several inexpensive ($100) energy monitors on the market, which in my view are worth little more than saving a trip outside to read the meter on the wall.  There are also a number of fancy and expensive ($10,000) energy monitoring systems with flat screen displays and all sorts of information intended for the lobbies of office buildings or high schools. 


So I was delighted to turn up a small local company called Converged Green that provides an affordable device that can monitor every single circuit in the house and lets us customize how we log and display it.  Best of all, it only draws 5 watts of power so it does not waste energy saving energy!


The electricity is measured using current transducers (CTs), which are little metal donuts that encircle the hot wire of each circuit in the electrical panel.  Each piece of equipment (range hood, water heater, etc) has its own dedicated circuit anyway.  But we had to instruct the electrician to group lighting on lighting-only circuits so that we get pure readings for each category.


EHH week 32: exterior sun shades

This house presented a challenge for solar design.  Since the site has a great view of the lake and mountains to the west, we oriented the house north-south such that most rooms have a west facing window to enjoy the view.  There is only one small window facing south in the entire house.


Paradoxically, the only solar heat we could get through the windows would come from the west in summer afternoons, just when we don’t want it.  So instead of letting the sun in, we need to keep it out.  In a superinsulated house like this one, that is especially important to avoid overheating.


We selected low solar heat gain coefficient (SHGC) glass for the windows.  A special coating blocks 79% of the sun’s heat without affecting the clarity of the view.  For the hottest summer days, we also installed exterior sunshades.  Unlike interior blinds, the exterior shades stop the sun before it passes through the glass and becomes internal heat. 


The shades are controlled by a hand held remote so the homeowners can lower them when the sun is strong.  They are made of PVC fabric in an open weave, so they allow a partial view out, even when they are covering the window glass.  Aluminum guides along the sides keep them in place if it is windy.


It is important to note that we are not restricting the sun’s daylight, just the solar heat.  The windows have a visible transmittance (VT) of 57%, so they let in plenty of daylight.

EHH week 31: interior stair

Most of the main rooms are on the upper floor of this house, but a few important rooms are on the lower floor.  The stair between them is intended to allow a visual and audible awareness between the two levels, so that the upstairs and the downstairs would feel connected.


The design of the stair is decidedly modern in keeping with the aesthetic of the house.  The treads have open risers and the railing is a minimal cable style.  The treads are detailed to appear to float with hidden brackets connecting them to the side wall.  The open risers also allow the homeowners to see through the stair so the downstairs hallway does not feel like a dead end.


The metal for the stair is made of 85% recycled content steel, finished with a durable and low toxic polyester powder coating.  The wood treads are salvaged lumber from the military port of Oakland CA from buildings constructed in 1941, finished with a low VOC water based polyurethane.


After the house was framed, we shifted the stair about 1 foot to make more room at its head end.  The passage from the downstairs hall beneath the sloping steel beam felt a bit tight when we mocked it up.  Because the stair passes under a closet, we framed the floor of that closet a little shallower to afford more headroom.  Anticipating this possible change, we had earlier oversized the structural floor opening at the stairwell in case we needed to shift the stair.  I’m glad we planned for that!

EHH week 30: rain garden

The rain garden is complete.  Its job is to collect all the stormwater from the site (see Week 16 blog) and allow it to gradually disperse.  During a storm, rain enters at the top and as upper pools fill, they spill over to lower ones in a controlled manner through a notch in the top of each concrete wall.  The entire rain garden can hold 90,000 gallons of water, which is a lot of rain.


Once full, the pools then gradually empty by either percolating down into the earth or evaporating up into the sky.  As the wetland plants in the rain garden mature they will help speed the rate of emptying.


The landscape contractor managed to redistribute all the dirt from the rain garden excavation.  So the project has not had to export any dirt, which is a success ecologically and economically.


Rain gardens are becoming more common in the greater Seattle area.  They have been used at shopping center parking lots and along the sides of residential streets.  For sites with restricted areas, buried detention pipes are a better solution.  But for sites with enough footprint area, I really like the way that rain gardens make visible the process of stormwater collection and dispersion.  They are miniature versions of nature’s hydrological cycle.

EHH week 29: indoor air quality

In all houses, but especially in an airtight one like this house, it is very important to manage indoor air quality (IAQ) during construction.  That means three practices the builders must make habitual:

1)    prohibit volatile chemicals inside

2)    minimize dust generation

3)    blow dust and chemicals out


Model Remodel has done a stellar job of managing IAQ.  Every tube of caulk, can of sealer, or jug of adhesive has been policed by the superintendent to assure that only low or no VOC (Volatile Organic Compound) products are used inside (and outside for that matter).  Fans are turned on whenever dusty or wet work is underway to blow contaminants outside.


Two operations in particular are notoriously dusty.  Cutting and sanding gypsum board can leave a house covered in a fine layer of noxious white gypsum dust.  Blowing cellulose insulation can make the interior feel like a Dust Bowl storm.  On a visit to the job site after each of these tasks, I was amazed at the clarity of the air and absence of dust.


The benefit for the workers and the homeowners is clean air inside to protect their lungs.  Once the house is occupied, all incoming air will be filtered to MERV 12.  Only particles 1 micron or smaller can get in.  That is almost as good as a hospital surgery room.

EHH week 28: interior trim

As the superintendent likes to remind me, the sequence of construction for this house is not normal.  Most houses install wiring, hang wall board, then set the doors, then lay flooring, then install trim: 1, 2, 3, 4, 5.  For this house the concrete flooring went in first, followed by the wiring, the doors, then the trim, and finally the wall board: 4, 1, 3, 5, 2.


The cause of this deviation is the aluminum reveal we architects chose for the trim where floor and doors meet walls.  Traditional houses use wood boards to cover these joints, but for modern houses the preferred detail is without face trim.  The look is terrific--clean and spare--but it makes for a fussy install.


Like wood trim, the aluminum is carefully mitred to mate it to its neighbor at corners and intersections.  Unlike wood, the metal cannot be readily shaved, bowed, or otherwise adjusted to ease it into place.  Its rigidity is proving very frustrating for the builder.


The interior doors are veneered in a lovely alder and are certified to be sustainably harvested by the Forest Stewardship Council.  In order to assure that 100% of the wood in the house is FSC, Model Remodel took two extraordinary measures.  Unable to find FSC wood shims, they are using ABS plastic wedge shims instead.  And the pocket door frame kit came without FSC wood, so they removed it and installed FSC wood in its place.

EHH week 27: rain filters

In order to deliver the house to the owners with completely full rain tanks, we needed to start filling them two months in advance.  In late February the plumber connected the various pipes and fittings to make them into a working system.


Upstream of the tanks is a vortex filter that siphons off leaf debris.  The four tanks are connected to each other near the bottom so the water in them rises and falls in unison.  The master tank has a pipe at the top where rain flows in by gravity and a hose floating inside through which water is sucked out by the pump.


The pump cycles on and off to pressurize a blue bladder tank which can handle surges, like the clothes washer turning on.  From there the rain is either sent unfiltered to the irrigation system or filtered to the plumbing fixtures in the house.  The filters get down to 1 micron, smaller than bacteria, and then any remaining viruses are sterilized with UV light.  The final step is a carbon filter to improve taste.


In among the filters are shut off valves for servicing along with gauges and meters for diagnostics.  The meters are connected to the home’s digital monitoring system so the homeowners can track their water usage online.


Expected maintenance involves annually replacing the UV light and quarterly replacing the two filters.  If the tanks need to be cleaned out for some reason, we can open a valve and let them gravity drain into the rain garden outside.

EHH week 26: steel railings

The steel decks and bridge have been installed, all but completing the exterior.  We chose steel because it looks better than wood when viewed from below and because it is strong and durable.  For the decking boards that are the walking surface we used tigerwood, a naturally rot resistant tropical wood that has a color and figure suiting its name.


All the steel for this project is 86% recycled steel from the rolling mill.  After cutting, drilling, and welding in the shop to fabricate the specific pieces needed for this house, it is sent for finishing.  We used a polyester powdercoat that is baked on.  The advantages over paint are several:  it is almost impossible to scratch, it never needs to be recoated, and it requires no solvent chemical to apply.


Before any steel is fabricated, each piece is drawn by hand by a detailer, in this case Ty Torjussen.  He is careful and thorough and I really enjoyed working through the nitty gritty issues with him.  Despite our care, it is always a nervous moment when the steel gets delivered and installed.  Will it all fit?  Sure enough, we overlooked one place where it was impossible to install screws into the decking boards.  So Model Remodel had to remove and alter a few pieces of steel to make it work.


The decks allow the homeowners to step outside and the stairs lead down to the garden.  For the first time, it feels like the home is connected to its garden.

EHH week 25: exterior siding

While most of the exterior siding is corrugated steel, there are some areas of fiber cement boards and accents of laminated wood panels as well.  The fiber cement is installed as usual with hidden nails, but for the laminated wood we chose exposed stainless steel screws.  I really like the way the different materials complement each other.


In order to assure that any rain that gets behind these sidings can freely flow down and away, we install them with a rain screen shim.  Coravent makes a great product for this purpose, a black plastic hollow strip that is fairly thin, impervious to water, and keeps insects out of the hidden space.


Just as we want to avoid having rain collect behind the siding, we want a clear air space between the steel decks and the siding, too.  Because the siding has 2 inches of foam insulation behind it, we installed steel standoffs to securely hold the deck ledger out away from the siding.


The exterior skin of this house is state of the art.  Its outer layer is durable materials that need no maintenance, except for infrequent painting of the fiber cement siding.  All the siding has a rain screen space behind it to allow it to dry easily.  A vapor permeable wrap keeps the rain out but allows the wall to dry if needed.  The rigid foam adds R-value and eliminates thermal bridging at the framing.  And the plywood sheathing with taped seams is a robust air barrier.

EHH week 24: metal siding

With the weather enclosure of the house complete, the siding can be installed.  It is very exciting to see the final exterior go on!


Most of the siding is prefinished steel, to meet the homeowner’s request for durable, affordable, and zero maintenance.  We chose a corrugated panel with fairly narrow ribs for a more elegant and less industrial look, Custom Bilt Contour.  The ribs are oriented vertically both for looks and to let rain run down easily.  The color is baked on, like an automobile, and should never need repainting. 


Various trim shapes (L, Z, J) are employed where the corrugated siding meets windows, corners, or another material.  Each shape has to be lapped over the one below so that rain is shed down and away.  While the metal siding will repel most rain on its own, any rain that does get behind it will then be stopped by the building wrap.  This double barrier approach is essential in the rainy Pacific Northwest.


At the corners of the house and garage, we used a back-to-back J trim to keep it visually narrow.  It is common to see corners with a single L that covers both walls with a wide--and to my eyes unsightly--trim.


The key to metal siding is to have a craftsperson install it.  Done right, it will look beautiful, especially up close, and will be the most durable.  The crew from Consolidated Roofing, the same folks who installed the metal roofing, is doing a beautiful job.

EHH week 23: PV system

With the array rack in place, it was time to install the PV panels.  Each one is 4 feet by 4 feet and secured to a special stairstep bracket that allows air to pass around it to help keep it cool.  Ironically, the hotter the panels are, the less power they generate.  The bracket also provides a nifty chase for the wiring that runs from the back of each panel.  The brackets are bolted to aluminum rails which in turn are bolted to the steel pipe rack.  Simple.


The panels are Silicon Energy Cascade SiE195, made about an hour away in Marysville, Washington.  They arrive in tidy flat stacks and are absolutely gorgeous.  They have no aluminum frame like most PV panels.  And they don’t have a white PVC backing, so they look great from below, which is how the homeowners will see them.  The cells are spaced apart a little bit, so you can actually see the sky through the glass gaps.


The electricity they generate is fed to two DC to AC inverters, SMA America Sunny Boy 8000-US (grey), which send electrons to the utility grid and to four AC to DC inverters, Sunny Island 5048-US (yellow).  The yellow inverters charge the 24 on-site sealed-lead-acid batteries, Sun Xtender PVX-12150HT, that live in cabinets in the garage.  If the power grid goes out, like it did for 300,000 people during a blizzard a few weeks ago in January 2012, the batteries can keep this house humming along.

EHH week 22: PV rack

The Eastside Harvest House is aiming to be a net-zero energy building.  That means that it will generate on site at least 100% of the energy it uses on site.  All the energy the homeowners use for heating, hot water, air conditioning, lighting, cooking, fans, pumps, computers—everything—is expected to be 15,500 kWh (kilowatt hours) for a whole year. 


To generate that much electricity, they need to install a 17 kW (kilowatt) PV (photovoltaic) system.  A fixed 1 kW PV array tilted at a near optimum 25 degree angle from the horizontal and facing due south generates about 980 kWh annually in the Seattle area, even with our notoriously cloudy weather. 


That means we need a 60 foot long by 24 foot tall array.  We can’t use the roof of the house or garage because they face the wrong direction, aren’t steep enough, and are too small.  So the solar contractor built a custom rack from steel pipe.  It runs over the garage and is partly supported by the garage roof.  The rest lands on concrete footings on the ground, each at a different height which required precise lengths of pipe.


The rack made use of standard pipe fittings to make it relatively easy to weld together in the shop and then assemble with bolts in the field.  It is powdercoated black to stand up to the weather and look sleek.  A structural engineer made sure it can resist strong winds trying to send the PV panels into the neighbor’s yard.

EHH week 21: vegetable garden

The Eastside Harvest House has devoted a significant part of its 1 acre lot to raised bed vegetable gardens and an adjacent fruit orchard.  The design of these beds changed from 30 rectangular beds boxed in by cedar timbers to 5 terraces retained by stone walls for greater flexibility in crop arrangement. 


The terraces step down the 9% natural grade of the site.  The dry stack stone came direct from Iron Mountain quarry in nearby Granite Falls.


Besides a green thumb, the key to a successful garden is soil preparation.  The landscape installer, Northwest Bloom, did a great job.  Balancing cut and fill, they used lightweight equipment for the rough grading and machine tilled the dirt to a depth of 12 inches, to assure drainage.  Over top an 18 inch layer of “three way” (loam, sand, compost) mix was brought in, then top dressed with a 2 inch layer of certified organic worm castings from Yelm.


To protect the compost over the winter of 2011/2012, a cover crop called Austrian pea was planted and then covered with temporary plastic horticultural sheeting to prevent erosion and nutrient leaching.  In a few weeks the sheeting will be removed when the cover crop gets established.  Planting will take place in the spring of 2012. 

EHH week 20: air sealing

To build a net zero energy house it is essential to reduce air leakage to the bare minimum.  Doing so requires a comprehensive effort by the contractors to fill every gap between the heated inside and the outside.  Typical problem areas are at electrical outlets, light fixtures and switches, pipes and ducts, around windows and doors, and at wall intersections.  For this house, we used a combination of spray polyurethane foam and caulk to seal all these gaps.


During design, the architects determined the boundary of the air barrier surrounding the whole house.  At the walls and floor overhangs it is the plywood sheathing, which had all its joints covered with black butyl tape.  At the floor and foundation it is the concrete slab and walls.  And at the roof it is the sloped gypsum board ceiling, which had a dozen light fixtures hung from it that were enclosed in a special airtight plastic box.


To confirm air tightness, a device called a blower door is used to depressurize the interior to 50 pascals.  The blower fan is trying to suck outside air in, which can be felt by the test technician using a damp hand and an infrared camera.  A gap as small as that between two uneven pieces of wood is significant.


Our specs targeted 2.0 ACH50 (two air changes per hour at 50 pascals) as an ambitious maximum, but the team wanted to get much lower.  Our first blower door test achieved 1.6 ACH50, which is a terrific result.

EHH week 19: concrete floor polishing

The interior concrete floors have cured long enough that they are ready for polishing.  A heavy machine fitted with diamond tipped blades (reminds me of an electric shaving razor) makes several passes over the concrete surface.  Its job is to remove the “cream,” the uppermost 1/8 of an inch or so of cement that forms the skin of the cured concrete. 


Removing the cream exposes the pea gravel aggregate which gives the finished surface a lovely “salt and pepper” appearance.  The trick is to remove just enough to expose the aggregate without overdoing it so that the salt and pepper look gets too chunky.


Once the removal step is complete, polishing begins with successively finer grit, just like sanding a piece of wood.  The final grit for this project is 400, which we feel is not too shiny but still lets you see into the depth of the concrete, so to speak.  Before polishing the main floor, the contractor did a test patch to the satisfaction of architect and homeowner so everyone agreed on the look we were targeting.


As part of the polishing, a densifier is added to essentially fill in the pores of the concrete so it is resistant to water and stains.  The polished floor was then covered with protection boards for the duration of construction.  Just before turning the finished house over to the homeowners, the protection will be removed and one last densifier coat will be applied.  They will look gorgeous!