blog

EHH week 30: rain garden

The rain garden is complete.  Its job is to collect all the stormwater from the site (see Week 16 blog) and allow it to gradually disperse.  During a storm, rain enters at the top and as upper pools fill, they spill over to lower ones in a controlled manner through a notch in the top of each concrete wall.  The entire rain garden can hold 90,000 gallons of water, which is a lot of rain.


Once full, the pools then gradually empty by either percolating down into the earth or evaporating up into the sky.  As the wetland plants in the rain garden mature they will help speed the rate of emptying.


The landscape contractor managed to redistribute all the dirt from the rain garden excavation.  So the project has not had to export any dirt, which is a success ecologically and economically.


Rain gardens are becoming more common in the greater Seattle area.  They have been used at shopping center parking lots and along the sides of residential streets.  For sites with restricted areas, buried detention pipes are a better solution.  But for sites with enough footprint area, I really like the way that rain gardens make visible the process of stormwater collection and dispersion.  They are miniature versions of nature’s hydrological cycle.

EHH week 29: indoor air quality

In all houses, but especially in an airtight one like this house, it is very important to manage indoor air quality (IAQ) during construction.  That means three practices the builders must make habitual:

1)    prohibit volatile chemicals inside

2)    minimize dust generation

3)    blow dust and chemicals out


Model Remodel has done a stellar job of managing IAQ.  Every tube of caulk, can of sealer, or jug of adhesive has been policed by the superintendent to assure that only low or no VOC (Volatile Organic Compound) products are used inside (and outside for that matter).  Fans are turned on whenever dusty or wet work is underway to blow contaminants outside.


Two operations in particular are notoriously dusty.  Cutting and sanding gypsum board can leave a house covered in a fine layer of noxious white gypsum dust.  Blowing cellulose insulation can make the interior feel like a Dust Bowl storm.  On a visit to the job site after each of these tasks, I was amazed at the clarity of the air and absence of dust.


The benefit for the workers and the homeowners is clean air inside to protect their lungs.  Once the house is occupied, all incoming air will be filtered to MERV 12.  Only particles 1 micron or smaller can get in.  That is almost as good as a hospital surgery room.

EHH week 28: interior trim

As the superintendent likes to remind me, the sequence of construction for this house is not normal.  Most houses install wiring, hang wall board, then set the doors, then lay flooring, then install trim: 1, 2, 3, 4, 5.  For this house the concrete flooring went in first, followed by the wiring, the doors, then the trim, and finally the wall board: 4, 1, 3, 5, 2.


The cause of this deviation is the aluminum reveal we architects chose for the trim where floor and doors meet walls.  Traditional houses use wood boards to cover these joints, but for modern houses the preferred detail is without face trim.  The look is terrific--clean and spare--but it makes for a fussy install.


Like wood trim, the aluminum is carefully mitred to mate it to its neighbor at corners and intersections.  Unlike wood, the metal cannot be readily shaved, bowed, or otherwise adjusted to ease it into place.  Its rigidity is proving very frustrating for the builder.


The interior doors are veneered in a lovely alder and are certified to be sustainably harvested by the Forest Stewardship Council.  In order to assure that 100% of the wood in the house is FSC, Model Remodel took two extraordinary measures.  Unable to find FSC wood shims, they are using ABS plastic wedge shims instead.  And the pocket door frame kit came without FSC wood, so they removed it and installed FSC wood in its place.

EHH week 27: rain filters

In order to deliver the house to the owners with completely full rain tanks, we needed to start filling them two months in advance.  In late February the plumber connected the various pipes and fittings to make them into a working system.


Upstream of the tanks is a vortex filter that siphons off leaf debris.  The four tanks are connected to each other near the bottom so the water in them rises and falls in unison.  The master tank has a pipe at the top where rain flows in by gravity and a hose floating inside through which water is sucked out by the pump.


The pump cycles on and off to pressurize a blue bladder tank which can handle surges, like the clothes washer turning on.  From there the rain is either sent unfiltered to the irrigation system or filtered to the plumbing fixtures in the house.  The filters get down to 1 micron, smaller than bacteria, and then any remaining viruses are sterilized with UV light.  The final step is a carbon filter to improve taste.


In among the filters are shut off valves for servicing along with gauges and meters for diagnostics.  The meters are connected to the home’s digital monitoring system so the homeowners can track their water usage online.


Expected maintenance involves annually replacing the UV light and quarterly replacing the two filters.  If the tanks need to be cleaned out for some reason, we can open a valve and let them gravity drain into the rain garden outside.

EHH week 26: steel railings

The steel decks and bridge have been installed, all but completing the exterior.  We chose steel because it looks better than wood when viewed from below and because it is strong and durable.  For the decking boards that are the walking surface we used tigerwood, a naturally rot resistant tropical wood that has a color and figure suiting its name.


All the steel for this project is 86% recycled steel from the rolling mill.  After cutting, drilling, and welding in the shop to fabricate the specific pieces needed for this house, it is sent for finishing.  We used a polyester powdercoat that is baked on.  The advantages over paint are several:  it is almost impossible to scratch, it never needs to be recoated, and it requires no solvent chemical to apply.


Before any steel is fabricated, each piece is drawn by hand by a detailer, in this case Ty Torjussen.  He is careful and thorough and I really enjoyed working through the nitty gritty issues with him.  Despite our care, it is always a nervous moment when the steel gets delivered and installed.  Will it all fit?  Sure enough, we overlooked one place where it was impossible to install screws into the decking boards.  So Model Remodel had to remove and alter a few pieces of steel to make it work.


The decks allow the homeowners to step outside and the stairs lead down to the garden.  For the first time, it feels like the home is connected to its garden.

EHH week 25: exterior siding

While most of the exterior siding is corrugated steel, there are some areas of fiber cement boards and accents of laminated wood panels as well.  The fiber cement is installed as usual with hidden nails, but for the laminated wood we chose exposed stainless steel screws.  I really like the way the different materials complement each other.


In order to assure that any rain that gets behind these sidings can freely flow down and away, we install them with a rain screen shim.  Coravent makes a great product for this purpose, a black plastic hollow strip that is fairly thin, impervious to water, and keeps insects out of the hidden space.


Just as we want to avoid having rain collect behind the siding, we want a clear air space between the steel decks and the siding, too.  Because the siding has 2 inches of foam insulation behind it, we installed steel standoffs to securely hold the deck ledger out away from the siding.


The exterior skin of this house is state of the art.  Its outer layer is durable materials that need no maintenance, except for infrequent painting of the fiber cement siding.  All the siding has a rain screen space behind it to allow it to dry easily.  A vapor permeable wrap keeps the rain out but allows the wall to dry if needed.  The rigid foam adds R-value and eliminates thermal bridging at the framing.  And the plywood sheathing with taped seams is a robust air barrier.

EHH week 24: metal siding

With the weather enclosure of the house complete, the siding can be installed.  It is very exciting to see the final exterior go on!


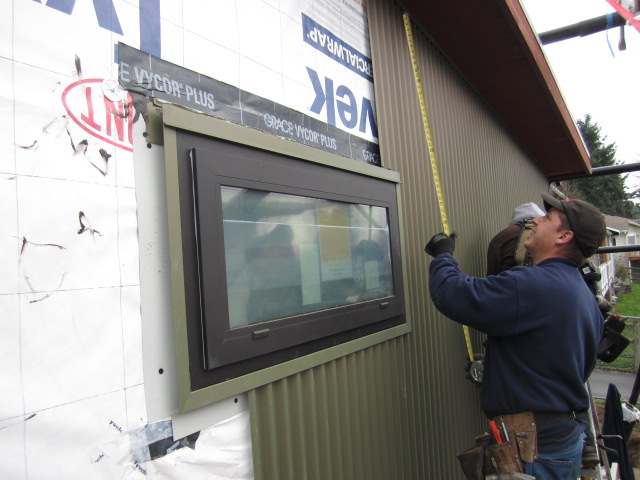
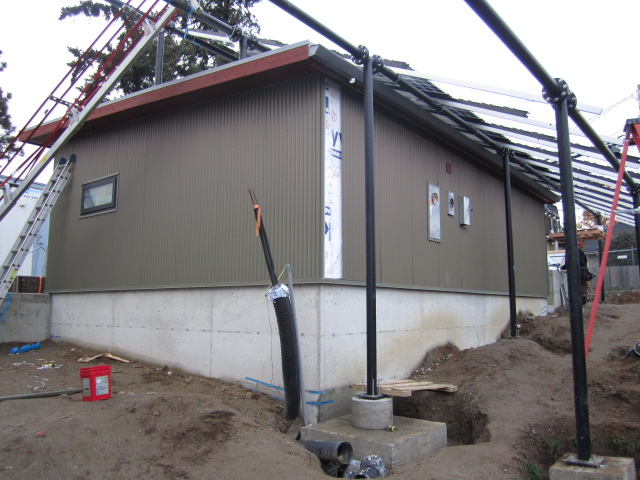
Most of the siding is prefinished steel, to meet the homeowner’s request for durable, affordable, and zero maintenance.  We chose a corrugated panel with fairly narrow ribs for a more elegant and less industrial look, Custom Bilt Contour.  The ribs are oriented vertically both for looks and to let rain run down easily.  The color is baked on, like an automobile, and should never need repainting. 


Various trim shapes (L, Z, J) are employed where the corrugated siding meets windows, corners, or another material.  Each shape has to be lapped over the one below so that rain is shed down and away.  While the metal siding will repel most rain on its own, any rain that does get behind it will then be stopped by the building wrap.  This double barrier approach is essential in the rainy Pacific Northwest.


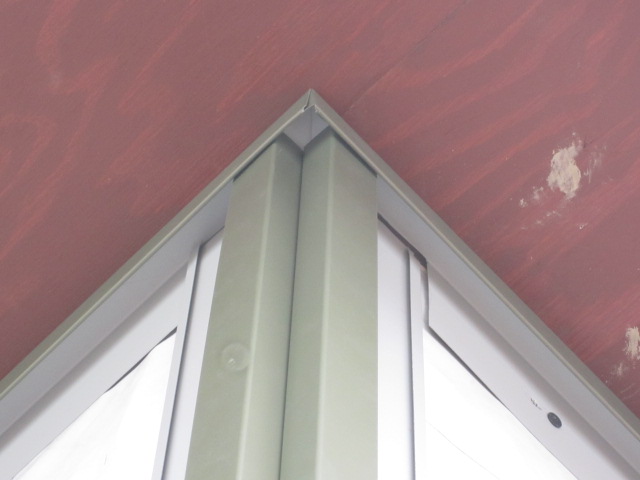
At the corners of the house and garage, we used a back-to-back J trim to keep it visually narrow.  It is common to see corners with a single L that covers both walls with a wide--and to my eyes unsightly--trim.


The key to metal siding is to have a craftsperson install it.  Done right, it will look beautiful, especially up close, and will be the most durable.  The crew from Consolidated Roofing, the same folks who installed the metal roofing, is doing a beautiful job.

EHH week 22: PV rack

The Eastside Harvest House is aiming to be a net-zero energy building.  That means that it will generate on site at least 100% of the energy it uses on site.  All the energy the homeowners use for heating, hot water, air conditioning, lighting, cooking, fans, pumps, computers—everything—is expected to be 15,500 kWh (kilowatt hours) for a whole year. 


To generate that much electricity, they need to install a 17 kW (kilowatt) PV (photovoltaic) system.  A fixed 1 kW PV array tilted at a near optimum 25 degree angle from the horizontal and facing due south generates about 980 kWh annually in the Seattle area, even with our notoriously cloudy weather. 


That means we need a 60 foot long by 24 foot tall array.  We can’t use the roof of the house or garage because they face the wrong direction, aren’t steep enough, and are too small.  So the solar contractor built a custom rack from steel pipe.  It runs over the garage and is partly supported by the garage roof.  The rest lands on concrete footings on the ground, each at a different height which required precise lengths of pipe.


The rack made use of standard pipe fittings to make it relatively easy to weld together in the shop and then assemble with bolts in the field.  It is powdercoated black to stand up to the weather and look sleek.  A structural engineer made sure it can resist strong winds trying to send the PV panels into the neighbor’s yard.

EHH week 20: air sealing

To build a net zero energy house it is essential to reduce air leakage to the bare minimum.  Doing so requires a comprehensive effort by the contractors to fill every gap between the heated inside and the outside.  Typical problem areas are at electrical outlets, light fixtures and switches, pipes and ducts, around windows and doors, and at wall intersections.  For this house, we used a combination of spray polyurethane foam and caulk to seal all these gaps.


During design, the architects determined the boundary of the air barrier surrounding the whole house.  At the walls and floor overhangs it is the plywood sheathing, which had all its joints covered with black butyl tape.  At the floor and foundation it is the concrete slab and walls.  And at the roof it is the sloped gypsum board ceiling, which had a dozen light fixtures hung from it that were enclosed in a special airtight plastic box.


To confirm air tightness, a device called a blower door is used to depressurize the interior to 50 pascals.  The blower fan is trying to suck outside air in, which can be felt by the test technician using a damp hand and an infrared camera.  A gap as small as that between two uneven pieces of wood is significant.


Our specs targeted 2.0 ACH50 (two air changes per hour at 50 pascals) as an ambitious maximum, but the team wanted to get much lower.  Our first blower door test achieved 1.6 ACH50, which is a terrific result.