blog

EHH week 18: metal roofing

The form of the roof for this house was driven by several factors.  Preference for a modern aesthetic dictated that it be flat with a shallow slope, which made it easy to stay under the 25 foot height limit.  We sloped it all to one side of the house, so the interior ceilings rise towards the western view and so the rain water all flows to the other side to simplify collection.  The exception to the main slope is on the street side, where we sloped the roof up in the middle to mark the entry on the front of the house.


For roofing material, we chose standing seam steel, prefinished with Kynar, one of only two types of roofing suitable for potable rainwater.  The other type is TPO, a white membrane roofing.  Because of the shallow 1:12 pitch, these standing seams needed to be crimped upon installation, rather than just snapped in place the way they are connected on steeper roofs.  To assure weathertightness, a high temperature underlayment covers the entire roof, a second layer of protection from the incessant Seattle area rain.


The color of the roofing is a nice steely gray called “preweathered zinc,” though it is important to note that it is not actual zinc metal but instead a PVDF “paint.”  True zinc would leach off the roofing and sully both the drinking water and the irrigation water.  And of course our roofing color has a Solar Reflective Index of 34, so that it reflects unwanted summer heat.

EHH week 16: rain garden excavation

As everyone knows, it rains in the Seattle area.  We get 37 inches in an average year, but once in a while we will get an inch in a single day.  In May 2011, Seattle got 1.78 inches over two days!  All that water has to go somewhere.


The Harvest House site is a wonderful piece of property (see blog 1), but its major defect is that there is no stormwater outlet pipe and the soils do not percolate particularly well.  So the civil engineer, springline design, designed a rain garden to collect and then gradually percolate the rain.


A rain garden is an open pit into which rain flows from the impervious surfaces on the site (see blog 10).  The bottom of the pit is filled with 18 inches of special soil designed to hold water like a sponge.  That soil is then planted with marsh plants.


When it rains, first the “sponge” gets soaked, then water will pool up to the rim of the pit.  Over a few days the water will gradually both evaporate and infiltrate into the ground below the rain garden.  The sloping site at this project required a series of 5 terraced pits, each with a concrete dam to hold back the ponded water.  The lowest pond is expected to never overflow its rim.


The excavation for this rain garden is huge, but the landscaper will spread the dirt pile around the rest of the site so we don’t need to export any off site.

EHH week 15: continuous exterior insulation

The big problem with insulating stud walls is…the studs.  Wood only insulates to R-1 per inch of thickness, while most insulation used in wood stud walls is more like R-3.5 per inch.  So every 24 inches we have a stud that lets out 3.5 times as much heat as the insulation next to it.  These passages for heat to escape are called thermal bridges.  They reduce a 2x6 at 24” stud wall with R-21 insulation from a potential R-23 wall (including all the material layers) to an effective R-20.5 wall, an 11% reduction.  If the studs are spaced closer at 16” it is even worse, an effective R-19.4 wall, a 16% reduction.


In order to reduce thermal bridges in the walls of the Eastside Harvest House, we decided to wrap them in rigid foam insulation.  At 2 inches thick, the foam adds another R-9 to the wall, for a potential R-32.  Significantly, the wrapped wall is an effective R-30, only a 7% reduction and one and a half times as good as the effective R-20.5 of the unwrapped wall.


Rigid foam is plastic resin foamed with a gas that can contribute to global warming. The worst offender in this regard is XPS (extruded polystyrene, often colored pink or blue or green) which is foamed with a greenhouse gas over 2000 times worse than CO2, the major climate change gas.  We used EPS (expanded polystyrene, usually white) instead which is foamed with pentane, only 3 times worse than CO2.

EHH week 14: concrete floor topping

The finished floor upstairs will be a polished concrete topping.  At just 2 inches thick, the concrete has pea gravel aggregate and is reinforced with steel mesh.  It was pumped into the house, then screeded and troweled to a smooth, flat surface.  Flat is crucial for the floor polishing to look good.


The subfloor is red!  The color comes from a waterproof coating sprayed over the entire plywood subfloor.  Since concrete is wet at first, we did not want all that water to soak the plywood that Model Remodel so carefully protected from rain all summer.  The coating also acts as a bond breaker, allowing the concrete to shrink and move independently of the plywood.


Since the finished floor will be “cast in concrete” it was crucial to lay out all the floor penetrations before the concrete is poured.  Items like electrical outlets, heating grilles, and some plumbing pipes were blocked out to the precise size of each recessed item.


The pour was done in two halves on two different days with a “cold” joint between.  After the concrete had hardened, control joints were saw cut into the surface using a wet saw and a vacuum to limit dust.  These joints are intended to control the surface cracks as the concrete dries so they fall in nice straight rectangular lines, instead of unsightly jagged cracks.  Both these joints will be filled with caulk to match the color of the concrete once it is polished.


A week after pour day, still no cracks!

EHH week 13: window spray test

If you have ever driven past a building wrapped in a tent, then you have seen the sad result when rain gets into the exterior of a building.  Eastside Harvest house aims to last for a century or more, so it has to be really good at keeping rain out.


Fortunately, a couple decades of studying rain intrusion failures have increased professional understanding of what does not work, and of what does.  We consulted a building scientist for this house because they have developed details at windows and other wall penetrations that effectively keep rain outside where it belongs.  And then we tested the first window installation to make sure we were right.


The test, ASTM E1105, is essentially an artificial rain storm.  An array of sprinkler heads sprayed water on the outside of the window at the rate of 5 gallons per hour per square foot.  Inside, a fan combined with a plastic sheet tried to suck the water in through any gaps, simulating wind-driven rain. 


The pressure gauge read 0.397 inches of water column, equivalent to 100 pascals, which is twice the pressure that we will be using later to test the whole house for air leaks.  The torture test lasted 15 minutes and if there was no sign of water inside, then the window passed.


It passed!

EHH week 12: view from house

The walls are framed and the rough window openings are all in place.  Now we can walk around inside and get a physical sense of the interior space.  And we get our first real look at the actual view out the main windows. 


The main great room (living, dining, and kitchen in one room) and the mother in law great room both have large windows with clerestories (a second row of upper windows) plus corner windows.  All these windows admit lots of daylight even on cloudy days.  And they afford a panoramic view over the lake to the mountains beyond, capturing one of the main assets of the site.


I have to say, the view is pretty spectacular!

EHH week 11: roof venting

The roof of this house is one large plane tipped up to the western view.  This shape allows us to stay under the 25 foot height limit (not easy to do with a two story house) and simplifies rainwater collection because everything flows towards one side of the house.


Because we are superinsulating, we are using the full depth of the roof joists for blown-in insulation.  Well, all except the upper 1-1/2 inches which must remain void to ventilate the roof.  This 1-1/2 inches allows air to carry away any vapor that condenses into water on the underside of the sheathing.  Without the ventilation space, the roof structure would rot.


The ventilation space must run continuously from the eave at the low end to the eave at the high end in every single joist bay.  I like to think of an ant crawling on the underside of the plywood from one edge of the roof to the other. 


Trouble is, seismic design wants to have the roof sheathing fully nailed at its perimeter to the tops of the exterior walls.  On this house, we solved the issue with semicircular holes in the perimeter blocking that allow nails between the holes.  At the rakes (the sloping sides of the roof) we had to lower the required cross blocking to avoid blocking the air passage.  And at the one part of the roof that is overframed, we drilled over 100 holes through the lower sheathing to let air pass up and out.

EHH week 09: advanced framing

Houses are usually built from wood, a lot of wood.  For this project, we decided to employ the Advanced Framing method to reduce the amount of wood we used.  The idea is to use just enough lumber for a strong structure, but no more.  This way we save on lumber cost, cut down fewer trees, and as a bonus get more insulation in our walls and ceilings.

The basic strategy is to install studs and joists at 24” spacing instead of the usual 16” spacing.  Additionally, extra studs called trimmers and cripples are eliminated where they can be.  Finally, we make sure that all cavities between the framing can be accessed from inside by the insulators so we don’t end up with any cold spots.  Sometimes in Advanced Framing the double plate at the top of the walls is just a single plate, but on this house aiming for extra seismic strength, we went with a double top plate.

The key to advanced framing is to stack roof joists over walls studs over floor trusses, all at 24” spacing.  That way the weight of the building gets transferred efficiently straight down to the foundation.  Windows and doors will interrupt this vertical path, and then headers are installed.  But the headers are sized individually depending on the specific load on each, rather than just using one standard oversized header at every opening.


EHH week 08: HVAC precon

This house will be heated (and sometimes cooled) by air running through ducts out to each of the rooms and back from some of the rooms.  There are actually quite a lot of ducts in this house, and the trick is routing them through the structure so they stay hidden above the ceiling or inside the walls.  Easier said than done.

Anticipating this common design problem, VELOCIPEDE made a 3D model of all the ducts to assure there was a viable route from central mechanical room to perimeter windows.  Then once the main floor was framed, the architect, mechanical engineer, general contractor, and HVAC contractor spent a couple hours at the site spotting the route of each and every duct.

This on-site planning effort is called a “precon” for preconstruction meeting.  We considered not just the ducts, but also the plumbing pipe routes, structural obstacles, and architectural niceties like centering grilles below windows.  There were (as there always are) a few problems that we had to work out in the precon.  For example, we had to change four 8” ducts serving the great room to three 9” ducts to better fit in the available joist bays.

Then we marked the chosen routes and grille locations right on the structure for the subcontractor to follow at install.  A couple hours of planning effort should avoid problems and make things go smoothly later on.  Remarkably, duct layout is usually left to the installers to figure out the day they arrive on site with a truckload of ducts and fittings.


EHH week 07: rain battles

Rain in July?  Is there no way to avoid rain in the greater Seattle area?

The project schedule was carefully planned to have wood framing occur in the driest months of the year, July and August.  But “summer” 2011 has been surprisingly rainy, including a whopper of a thunderstorm on 18 July 2011.

Fortunately, Model Remodel is on top of things.  Lumber waiting to be installed is wrapped with tarps and up off the ground.  Lumber that has been installed is protected with tarps.  And if rain does get on the floor deck or concrete slab, then the contractors use squeegees to push the puddles away and fans to blow dry things out.  Fortunately, most morning drizzles are followed by sunny afternoons, so drying usually occurs the same day.  Still, nail heads show telltale rust indicating they have gotten wet.

We really wanted to keep the lumber dry to avoid any mold problems later.  Under a microscope, wood is like a bundle of straws and they wick water and tenaciously hold onto it.  I like to think of framing in the rain as wearing a cotton T-shirt in the rain.  Both get wet and must be actively dried out or they will mold.

It will be a relief to get the roof on this building to help keep the weather out.


EHH week 06: sustainably harvested wood

The carpenters have begun!  We are rising out of the dirt and starting wood framing.  So let’s talk about wood.  Thinking of trees as just a source of wood is not seeing the forest for the trees.  

Trees are a key element of a forest ecosystem, and standard logging practice is brutal to that ecosystem.  Forests provide animal habitat, stabilize soil slopes, buffer rain runoff, transpire water back to the atmosphere, shade the surface of the earth, convert carbon dioxide into oxygen, and reduce the heat island effect.  Clearcut stump fields do none of those.

Back in 1993 an organization called the Forest Stewardship Council was formed to change forest management.  Somewhat akin to organic certification for vegetables, FSC certification assures that the wood used in a building project came from a forest that is both a healthy ecosystem and can continue to produce timber indefinitely.  FSC means no clearcuts, no old growth, is third party certified, and has a chain of custody to track the lumber from forest to construction site.

All the wood material in Northwest Harvest House, all 100%, is FSC certified as well as formaldehyde free.   We got the dimensional lumber (2x6s) from Gray Lumber and the engineered lumber (I-joists) from RedBuilt.  The homeowners paid a small premium for FSC certified material.  The upcharge was worth it to them because they wish to support healthy forests.  Think of it like a donation to the Sierra Club.


EHH week 05: avoiding pressure treated lumber

Part 2 of the quest to avoid toxic chemicals in this project (see week 4 for part 1).  Get ready for some acronyms.

Chemicals to keep wood from rotting, called PT for “pressure treated,” are by their very nature not “natural.”  I mean, wood in nature is supposed to rot.  But nobody wants rotting wood in a house.  So the wood treatment industry injects toxic chemicals into the cells of PT wood to prevent rot.

For decades, CCA (chromium copper arsenic) was used for PT.  But under pressure from the EPA (Environmental Protection Agency), CCA was phased out as of 2004.  Alas, there are still thousands of playgrounds with arsenic wood in this country.

Replacing CCA are ACQ (ammonium copper quaternary) and CA (copper azole). While the chromium and arsenic are gone, the copper remains.  And unfortunately it leaches out of the wood over time.  Copper is toxic to aquatic life if, or should I say when, it gets into the water.  So it is best to avoid PT lumber altogether.

The two most common places for PT lumber in a house are the mudsills and exterior decks.  The best way to deter rot is to keep wood dry.  Not an easy task in the rainy Pacific Northwest.  But we figured out how to do it.

Mudsills are the pieces of wood immediately on top of the concrete foundation wall.  Concrete in contact with the earth is always damp, and the moisture rots this critical piece of wood.  For this house, we isolated the mudsills from the concrete with an adhesive rubber membrane so no PT chemicals are needed.  

The exterior decks of the Northwest Harvest House are made of naturally rot resistant wood decking (ipe).  Supporting the decking is framing made of steel, so no PT lumber was necessary.

We did have to compromise when the electrical utility insisted on pressure treated lumber for the temporary power post, the only stick of PT lumber in the project.


EHH week 04: avoiding PVC

To reduce the toxicity of our work, we are systematically avoiding materials that are considered to be harmful to humans and the environment.  We even oiled the concrete forms with olive oil instead of the typical diesel oil.  It is surprising, and sad, how common these toxic chemicals are in buildings and it takes a lot of diligence to avoid them.  This post is a story of mostly victories but also a defeat.

PVC (polyvinyl chloride) is a plastic used to make many, many products because it is cheap and durable.  But its manufacture generates chemicals such as dioxins, pthalates, lead, mercury, and vinyl chloride monomer that cause cancer, harm the nervous system, and damage reproduction.  Worse, most of these chemicals are PBTs (persistent bioaccumulative toxins).  PBTs never seem to go away, and are now found in the breast milk of humans worldwide, and even in the tissues of polar bears and penguins.

We have worked hard to find PVC-free alternatives, starting with the site utilities.  The underslab plumbing pipe is ABS, the footing drain pipe is CPEP (polyethylene), and the sanitary sewer pipe is cast iron.  In all cases, the subcontractors arrived at the job site with PVC in their trucks, and Model Remodel had to send them back for an alternative.

We did end up using PVC for buried conduit, however.  The only legal alternatives are galvanized steel, which the electric utility rejected, or HDPE, which would have delayed the project for 6 weeks.


EHH week 03: foundation

The lower floor of the new house will be a concrete box, with full height foundation walls on all four sides.  These walls will be exposed, so the concrete subcontractor had to take extra care to layout the form boards and the snap tie spacing.  They did a beautiful job!  Amazingly, the long diagonals are only 1/16” different, meaning it is perfectly square.  The tall downhill wall is flat and plumb, a real work of art.

We are building this house from recycled materials.  The steel rebar is 100% recycled steel.  Under the slab on grade, instead of gravel we are using 100% recycled glass, called “cullet.”  It comes from the local curbside recycling bins that collect glass bottles.  The concrete wall has a brown dimpled drainage mat on the inside, made from 60% recycled HDPE.

The concrete mix contains blast furnace slag, a waste product from smelting iron into steel.  The slag has the added benefit of reducing the Portland cement from a typical 5-1/2 sacks per cubic yard (517 pounds) to only 2-1/2 sacks (235 pounds) without a loss in strength or durability.  Manufacturing 1 ton of Portland cement requires 6 million BTU of energy, so we are reducing our energy consumption before the house is even operational.  


EHH week 01: about Eastside Harvest House

Welcome to Eastside Harvest House, a new home designed to harvest food, sun, and rain on site.

A Kirkland couple seeking to build their new home had three main criteria for their site: ample space for an edible garden, room for elderly parents to live comfortably and share their home, and enjoying a sweeping view of Lake Washington and the Olympic Mountains.  They found a 1 acre dream site in the heart of Kirkland, largely undeveloped, with sweeping views of lake and mountains to the west.  The house is a 5 minute walk to grocery stores, coffee shops, retail, and restaurants.  There is a bus stop right at the street with service every 15 minutes to Kirkland, Bellevue, or Seattle, enabling car-free living.

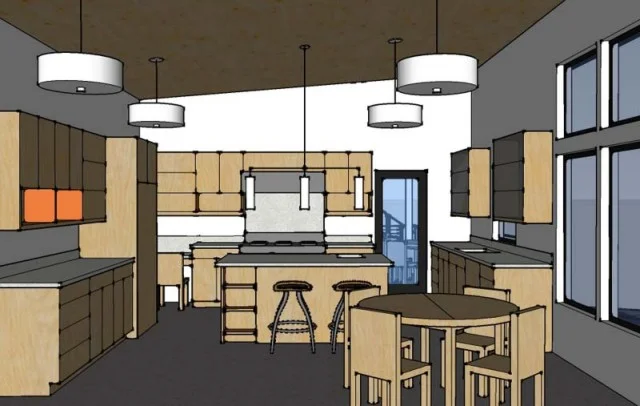
The site will boast an abundant 6500 square foot garden for the owners to grow their own fruits and vegetables.  Irrigation will be provided by a subsurface drip system to irrigate two dozen raised beds, a dozen fruit trees, and numerous edible berry bushes.  A basement root cellar will store the garden bounty and ample kitchen counter space will enable home canning in season for personal use or to give as homemade gifts.

This 3500 square foot single-family residence will be divided into two suites, each with its own kitchen.  The master suite will group the living, dining, and kitchen in one great room with a master bedroom and bath, a guest bedroom and bath, his and hers offices, and an exercise room.  The private in-law suite will have a smaller great room, with two bedrooms and one bath.

The floor plan allows for long term flexibility depending on the occupants.  The wall dividing the great rooms is structurally designed to allow connection as one single dwelling, perfect for a large family with the in law suite becoming the children’s wing.  But the wall can subsequently be divided again in the future to suit two smaller families.

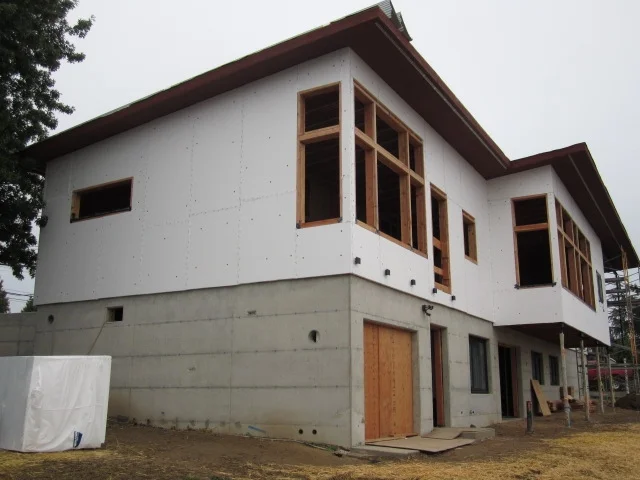
The house will be one story over a full daylight basement to fit it into the gently sloping site.  An elegant stair will connect the two levels.  However, all the principal rooms in both suites are located on the main floor flush with driveway grade to allow for accessibility for elderly parents now, and the middle aged owners in the future.  Bathrooms are designed with aging in place in mind, with curb-less showers, comfort height toilets, and grab bars.

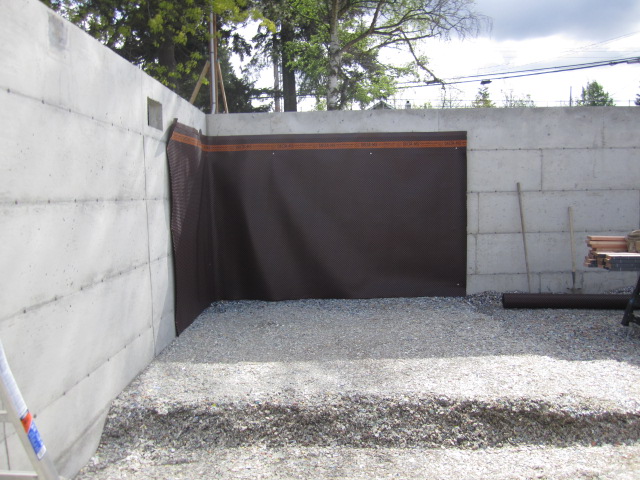
This house has ambitious ecological goals, targeting LEED for Homes Platinum and Built Green 5 Star certifications.  100% of stormwater will be captured and infiltrated on site in a 2200 cubic foot rain garden.  Rainwater from the metal roof will be collected in four cisterns in the basement totaling 12,000 gallons.  Filtration and UV sterilization will allow the homeowners to use the rainwater for potable purposes in addition to toilet flushing, laundry, and irrigation.  This is the first residence in King County to be permitted to drink its rainwater.  The project anticipates net zero energy, supplying 100% of its own power with a 17kW photovoltaic array and 30 evacuated solar hot water tubes.

The Eastside Harvest House is a truly functional, beautiful, and sustainable addition to the vibrant community of Kirkland.

Project statistics
Location: Kirkland, Washington
Lot size:  41019 square feet (almost 1 acre)
Number of units: 1 dwelling unit with attached mother in law suite
Total gross square footage: 4400 gross square feet (3570 conditioned)

Project Team
Client: (confidential)
Architect: VELOCIPEDE architects inc
Contractor: Model Remodel LLC
Civil engineer: springline design, LLC
Landscape architect: Outdoor Studio
Structural engineer: Harriott Smith Valentine Engineers, Inc.
Mechanical engineer: Ecotope, Inc.
Solar designer: Solterra Systems, Inc.
Surveyor: Pacific Geomatic Services, Inc.
Geotechnical engineer: Geotech Consultants, Inc.
Arborist: Urban Forestry Services, Inc.


EHH week 36: heating system

With a superinsulated enclosure and triple glazed windows, the heating system does not need to be big.  We considered and rejected both ground coupled heat (often called “geothermal”) and radiant floor heat because both would be overkill for the minimal needs of this house.


Ecotope, the mechanical engineer, recommended an inverter driven split system heat pump, made by Mitsubishi.  For each kilowatt of electricity input to a heat pump, it will provide about 2.5 kilowatts of heat, because a heat pump moves heat instead of generates heat.


A heat pump operates on the refrigeration cycle, but instead of cooling the inside of a refrigerator, it heats the inside of a room.  Heat pumps can provide air conditioning too, in which case they act just like a refrigerator. 


There is one outdoor unit, which is the compressor, attached to the garage.  Inside we have six zones, each with its own programmable thermostat.  Three of the zones have condenser units in utility rooms and their heat is distributed by ducts.  The ducts are air sealed at every joint with a gray mastic to eliminate leaks.  Aluminum diffusers at the end of the ducts are either set flush in the wood floors or on top of the concrete floors, so they look great and familiar.


The other three zones are heated by wall mounted condensers that emit low velocity heated air.  These white units, called “cassettes,” must sit high on a wall, usually over a door.  They are not as elegant as floor diffusers, so we used them in less important rooms. 

EHH week 35: painting

As the project nears the end, the walls and ceilings get painted.  To assure optimal indoor air quality, Model Remodel used a zero VOC (volatile organic compound) paint manufactured in nearby Portland, Oregon.  The painter had never used Yolo Colorhouse paint before, but was pleased that it went on smooth and leveled well.


The homeowners’ preference was for a simple color palette, so most of the paint is a creamy white.  A few rooms received accent colors, such as green in the master bedroom.  As is customary, each color choice was painted on a piece of wall before making the final selection.


Besides low VOC paint, all of the other finishes, sealers, caulks, and adhesives used in the interior of the house were specified to be low VOC.  This meant that there was no unpleasant chemical smell inside during the finishing phase of the project.


The house really looks sharp with the paint in place.  The white acts as a muted backdrop for the warmth of the wood floors or the cool grey of the concrete floors.  The dark window frames provide a bold accent, as does the powdercoated steel at beams and railings.  The absence of wood trim at windows, doors, and wall base is most noticeable now, and the spare detailing really makes for serene rooms.


EHH week 34: shower enclosure

For this house, we architects were asked for minimal maintenance finishes and in particular no tile grout joints.  This reasonable request posed a difficulty at the three showers, where tile is the material of choice.


To finish the shower enclosures, we selected a cement plaster called Milestone.  Since it is troweled in place it has no joints, just smooth surfaces.  The color is integral, consisting of mineral pigments just like colored concrete.  And it goes on walls and floors so we could use the same mix and color for all surfaces.


To form the shower pans, we recessed the floor structure a couple inches.  This recess was waterproofed with Red Guard, the same liquid applied membrane we used under the concrete floor topping.  Before proceeding, the membrane is flooded and allowed to stand for 24 hours to assure there are no leaks.  The recess was reinforced with metal lath and then filled with a mortar bed mix that is fairly dry.  The mortar bed is formed to slope towards a central drain.  After it cures, the cement plaster is troweled over it.


As an aging-in-place feature, we designed the shower stalls with a flush threshold instead of a raised curb.  At one shower that will be used now by 80-year olds we installed grab bars.  In the other that will be used by 50-year olds we omitted the grab bars for the moment, but installed wood blocking inside the walls ready for grab bar screws in the future.

EHH week 32: exterior sun shades

This house presented a challenge for solar design.  Since the site has a great view of the lake and mountains to the west, we oriented the house north-south such that most rooms have a west facing window to enjoy the view.  There is only one small window facing south in the entire house.


Paradoxically, the only solar heat we could get through the windows would come from the west in summer afternoons, just when we don’t want it.  So instead of letting the sun in, we need to keep it out.  In a superinsulated house like this one, that is especially important to avoid overheating.


We selected low solar heat gain coefficient (SHGC) glass for the windows.  A special coating blocks 79% of the sun’s heat without affecting the clarity of the view.  For the hottest summer days, we also installed exterior sunshades.  Unlike interior blinds, the exterior shades stop the sun before it passes through the glass and becomes internal heat. 


The shades are controlled by a hand held remote so the homeowners can lower them when the sun is strong.  They are made of PVC fabric in an open weave, so they allow a partial view out, even when they are covering the window glass.  Aluminum guides along the sides keep them in place if it is windy.


It is important to note that we are not restricting the sun’s daylight, just the solar heat.  The windows have a visible transmittance (VT) of 57%, so they let in plenty of daylight.

EHH week 31: interior stair

Most of the main rooms are on the upper floor of this house, but a few important rooms are on the lower floor.  The stair between them is intended to allow a visual and audible awareness between the two levels, so that the upstairs and the downstairs would feel connected.


The design of the stair is decidedly modern in keeping with the aesthetic of the house.  The treads have open risers and the railing is a minimal cable style.  The treads are detailed to appear to float with hidden brackets connecting them to the side wall.  The open risers also allow the homeowners to see through the stair so the downstairs hallway does not feel like a dead end.


The metal for the stair is made of 85% recycled content steel, finished with a durable and low toxic polyester powder coating.  The wood treads are salvaged lumber from the military port of Oakland CA from buildings constructed in 1941, finished with a low VOC water based polyurethane.


After the house was framed, we shifted the stair about 1 foot to make more room at its head end.  The passage from the downstairs hall beneath the sloping steel beam felt a bit tight when we mocked it up.  Because the stair passes under a closet, we framed the floor of that closet a little shallower to afford more headroom.  Anticipating this possible change, we had earlier oversized the structural floor opening at the stairwell in case we needed to shift the stair.  I’m glad we planned for that!